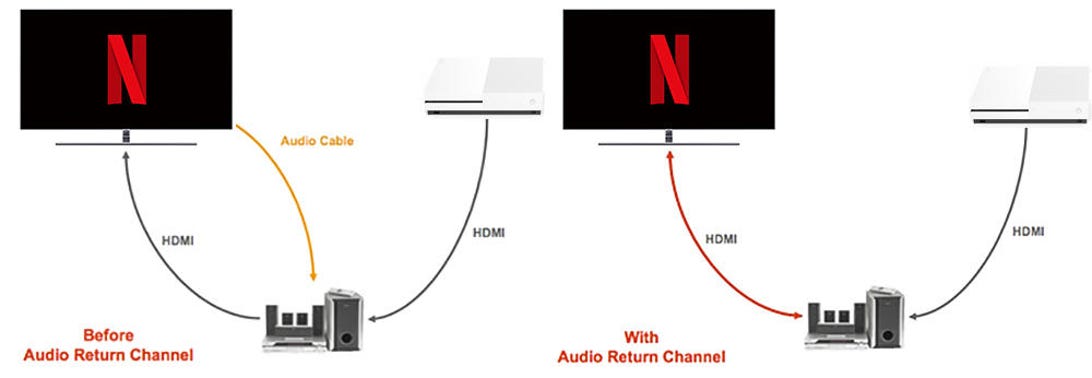
HDMI ARC and eARC: Audio Return Channel
One of the best and yet least-understood HDMI features are ARC, or Audio Return Channel. It’s a feature that enables you to simplify your system and is compatible with most TVs, receivers, and soundbars.
In its most basic form, ARC uses an HDMI cable to send audio from a TV back to a receiver or soundbar. That means you can use a single cable for both audio and video — for example, from the Netflix app built into your TV or a connected game console, and then use your TV for switching.
The eARC standard, which is a part of HDMI 2.1, improves on the original in a few key ways including supporting Dolby Atmos, and we’ll discuss this in more depth shortly.
Do you need ARC?
To be fair, many people don’t need ARC. If you only listen to audio using your TV’s speakers and don’t have a receiver or soundbar, then the feature is superfluous. The point of ARC is to send audio created by or switched through your TV to an external audio device, namely a soundbar or receiver.
And because the sound on most TVs is terrible, we strongly recommend getting at least a soundbar to improve the TV experience. Check out our how-to buy a soundbar guide and soundbar vs. speakers for more.
If you have a soundbar or receiver of fairly recent vintage that has HDMI, it probably has ARC, too. Here’s how it works.

Can you use ARC?
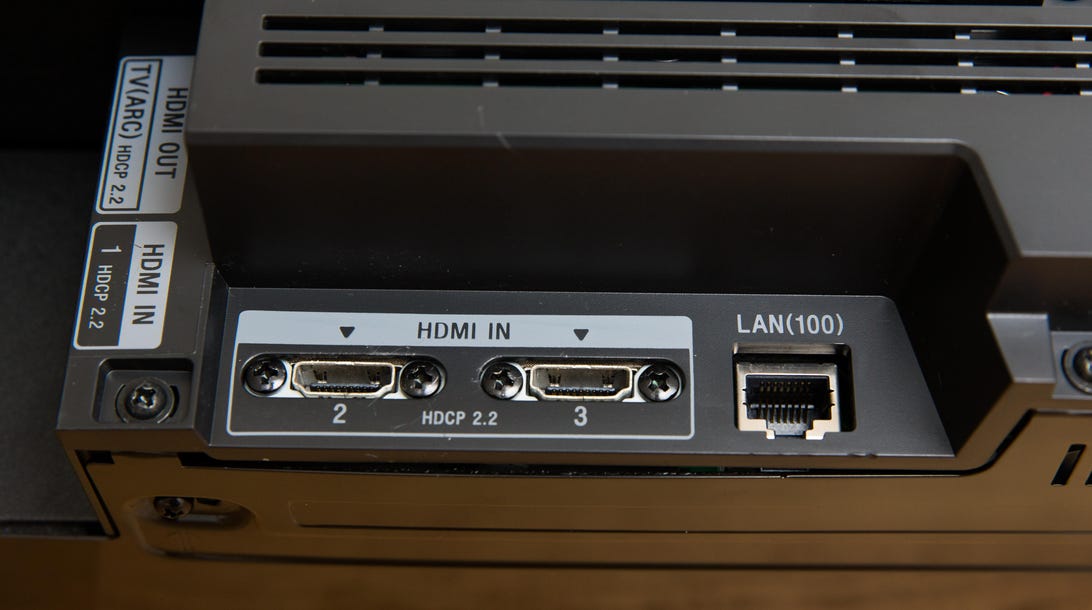
Check the HDMI connections on the back of your TV, soundbar, or receiver. If the HDMI port has ARC, it should be marked as such. Both your TV and the soundbar or receiver must have ARC for it to work.

eARC and HDMI 2.1
The latest version of the HDMI interface is HDMI 2.1, and it offers numerous important changes including support for higher resolutions. Relevant to us in the context of this article is eARC, or enhanced Audio Return Channel.
While Dolby Atmos can be passed over regular ARC today (via Dolby Digital Plus) eARC offers improved bandwidth for higher-quality Dolby TrueHD and DTS-HD Master Audio streams, including Dolby Atmos.
The new format also has lip-sync compensation built-in. This feature was optional in ARC but is now required. This lets you more easily line up the sound with the visuals, something that has always been an issue in the modern TV era.

To take advantage of the new features, both pieces of gear must be eARC compatible. Fortunately, eARC is available in far more gear than just high-end 8K TVs. From 2019 onward, compatible devices include the Sonos Beam, the Yamaha RX-V6A, and the Sony X950. The format is backward-compatible with ARC, but don’t expect to stream Atmos through an older TV. Even though most new TVs don’t need the other features of HDMI 2.1, manufacturers can implement the most useful portions of HDMI 2.1, such as eARC.
You probably don’t need new HDMI cables for eARC. Older cables with Ethernet, either Standard or High Speed, will work. The new Ultra High-Speed cables will work as well, of course. But chances are your current cables have Ethernet and you didn’t even know it, so they’ll probably work, too. N.B.: In order to take advantage of some HDMI 2.1 gaming features, such as Variable Refresh Rate (VRR) and 4K 120Hz, a high-speed cable is needed or you’ll simply get no signal.
Setup
Most HDMI cables should work with ARC. Plug one end of the HDMI cable into the ARC-capable HDMI input in your TV and the other into the ARC-capable output on your soundbar or receiver.
There are basically two main ways to connect a system using ARC. For our purposes, we’ll assume you have: a TV, a receiver or soundbar, a Blu-ray player, and a game console (Xbox or PlayStation).

1. Using the TV as an HDMI switch: Connect the Blu-ray player and game console to the TV, then connect a single HDMI cable from the TV to the soundbar. The TV becomes the central hub of your entertainment system.
This setup lets you use your TV’s remote to switch between the Blu-ray player and game console sources, and in most cases, you can use your TV’s remote to control the volume.
The potential downside of this setup is you might not be able to get 5.1 or higher surround sound. This is more of a problem if you are using a surround receiver instead of most soundbars (which typically can’t playback 5.1). We’ll discuss this more in the “Issues with 5.1” section.
2. Using a receiver or soundbar as an HDMI switch: Connect the Blu-ray player or game console to the receiver or soundbar, then a single cable to the TV. Some budget soundbars might not have enough HDMI inputs for all your sources, in which case you’ll have to use Setup 1.
In this setup, your receiver/soundbar is the central hub of the entertainment system. You will switch between your sources and adjust the volume using your receiver/soundbar’s remote. You’ll only use your TV’s remote to turn the TV on and access any apps built into the TV.
HDMI CEC control
Another HDMI feature is called CEC, or Consumer Electronics Control. Nearly every company has its own name for it, including SimpLink, Anynet+, BRAVIA Sync, and others. In theory, CEC will let the remote from one piece of gear control another, as long as they’re connected with HDMI. For instance, in Setup 1 above, your TV’s remote can adjust the volume on your soundbar.
However, there’s no guarantee it will work, especially across different brands or ages of gear. If there’s any aspect of ARC setup that’s going to cause you agony, it’s this. You might not be able to realize the dream of using one remote unless you get a universal remote control. If it doesn’t work, though, Google might help. It could be as simple as having to turn on your gear in a certain order. But in the end, this control aspect just might not function.https://www.youtube.com/embed/2JC6N8EzNpk
Troubleshooting
The last setup step is making sure your TV and soundbar/receiver know to send or look for the audio being sent over the Audio Return Channel. If you’ve got everything connected correctly, and it’s not working, time to dive into the settings. It should be fairly obvious in the setup menus, but if not, all owner’s manuals are on the manufacturer’s website.
One last thing to check. If everything else seems correct, but you’re still not getting audio, or you get audio with some sources but not all, check the audio output settings on the TV or the problematic source. Look for a setting that lets you change “bitstream” to “PCM” or vice versa. Switching to the other might clear up the issue.

Issues with 5.1
As great as ARC can be, there is one big issue: 5.1. Technically, TVs aren’t allowed to send 5.1 audio over HDMI. In other words, if you’re watching a movie on Blu-ray with 5.1 Dolby Digital or DTS and it’s connected directly to your TV (Setup 1, above) your receiver might only be able to get 2.0 audio. TVs that can do this are said to have a “5.1 passthrough.” This restriction helped lead to the creation of eARC which we’ll discuss shortly, but it enables external speakers to playback both the 5.1 channel and Dolby Atmos.
Some existing TVs can still do 5.1 while other TVs will output 5.1 via the optical output, but not ARC. Our friends over at Rtings.com have an extensive list of what TVs do what, though it only goes back to 2017.
Keep in mind that this issue is only relevant if you have a 5.1 source, like a Blu-ray player or game console, and you’re trying to send that device’s audio via ARC from the TV to a receiver. If your TV doesn’t support 5.1 passthrough, you can either connect that source to the receiver directly, or you can connect the TV and receiver with an optical cable. Optical cables don’t carry Atmos, however.
Connecting a source like Blu-ray directly to the receiver/soundbar has another benefit: Doly Atmos, Dolby True HD, and DTS Master Audio. If you have an older TV these higher-fidelity formats can’t be sent over ARC. But they will be able to with eARC.
